Before we cut to the chase, there is one small thing to address. If anyone has seen my twitter they will know that the main structure of the robotic arm has been completed. I have taken a video and I am not exaggerating when I say that I had to hold the camera with both hands just to stop it from shaking to much, to say I was excited was an understatement. However, in order to do the description of that fabled event justice, I have decided to postpone that blog post. I really cannot be too tired when I write it!
SO! Onto the topic of the day, there's no time like the present, so lets not forget ourselves and run before we can blog. Each event deserves it own description, Arduino especially.
SO! Onto the topic of the day, there's no time like the present, so lets not forget ourselves and run before we can blog. Each event deserves it own description, Arduino especially.
Now for those of you that are more dedicated readers of the blog or have just read a few of my earlier posts, you will know that I took Electronics at GCSE and I am taking Systems and Control at A-Level. Naturally this means that I have an interest in circuitry. Now I am no Bill Gates when it comes to the world of PCB's and Electronics, but I can navigate my way around a circuit board fairly well. In particular I love controlling objects in the real world that move mechanisms (hence the robotic arm), and there is in many ways nothing more perfect for this than the Arduino! Arduino is specifically designed around controlling real life objects; this means that it's functionality in terms of input and output control is vast. It can read values from analogue inputs and display these real time on the screen, for example give a live temperature feedback or tell you the light level in lumens. This means that projects such as making your own digital clock, pinball machine, etc. Are easily within the Arduino's capabilities. It's a jack of all trades, and that makes it perfect for the hobbyist.
I now owe you, the reader, an apology. As things are about to get slightly technical. It's always annoying when your in a conversation and then the other two people start using words you don't understand. You feel as though they've loaded you into a cannon, lit the fuse and waved goodbye! Ill try to explain myself as much as possible.
The Arduino is actually a board that uses the ATMega Microcontroller Chips as it's main brain. A Microcontroller is sort of like a mini computer, it can sense inputs and be programmed to turn on certain outputs accordingly. For example, it monitors a button to see if it is pressed, if the button is pressed then it lights an LED (Light Emitting Diode). Now the ATMega Chips are brilliant, however the language is rather confusing to program and thus for the average hobbyist who may not have a lot of time to invest this is rather an inconvenience. Arduino is great because it takes the language and converts it into Arduino's simpler language. This makes it easier to learn and quicker to code, its a win win all round for the Hobbyist! As well as this it lays out the pins on the chip to some simple female header pins (rather like ports that wires can be plugged into) so that prototypes can be bread boarded (like a none permanent PCB) easily and efficiently using jump leads.
I hope you follow! Simply, the Arduino is used to make Electronics and Microcontrollers accessible to everyone!
So are you interested?
If you are then I have a suggestion for you, especially if you have either little to no experience of electronics or like me you have no electronics components at home to use. There is a Arduino Starter Kit! This kit is designed to teach someone who has no previous experience of Electronics or Programming how to use Arduino. It does this through 15 projects that progressively increase in complexity and difficulty. All the things you need to complete these projects are provided in the kit, the kit includes:
This kit is fantastic value for money! I could not recommend it enough! The amount of things you get for the price and the knowledge it gives you are simply fantastic! For those new to the hobby, you would be hard pushed to find something more suitable. However if you are more experienced at Electronics and have components to use in your projects then you can just by a base Arduino Board seperately. However you will need a USB A to USB B cable to program your board. Here's a link!
I now owe you, the reader, an apology. As things are about to get slightly technical. It's always annoying when your in a conversation and then the other two people start using words you don't understand. You feel as though they've loaded you into a cannon, lit the fuse and waved goodbye! Ill try to explain myself as much as possible.
The Arduino is actually a board that uses the ATMega Microcontroller Chips as it's main brain. A Microcontroller is sort of like a mini computer, it can sense inputs and be programmed to turn on certain outputs accordingly. For example, it monitors a button to see if it is pressed, if the button is pressed then it lights an LED (Light Emitting Diode). Now the ATMega Chips are brilliant, however the language is rather confusing to program and thus for the average hobbyist who may not have a lot of time to invest this is rather an inconvenience. Arduino is great because it takes the language and converts it into Arduino's simpler language. This makes it easier to learn and quicker to code, its a win win all round for the Hobbyist! As well as this it lays out the pins on the chip to some simple female header pins (rather like ports that wires can be plugged into) so that prototypes can be bread boarded (like a none permanent PCB) easily and efficiently using jump leads.
I hope you follow! Simply, the Arduino is used to make Electronics and Microcontrollers accessible to everyone!
So are you interested?
If you are then I have a suggestion for you, especially if you have either little to no experience of electronics or like me you have no electronics components at home to use. There is a Arduino Starter Kit! This kit is designed to teach someone who has no previous experience of Electronics or Programming how to use Arduino. It does this through 15 projects that progressively increase in complexity and difficulty. All the things you need to complete these projects are provided in the kit, the kit includes:
- The Arduino Projects Book - This is like your manual to liftoff. It contains instructions on all the projects (Circuit Layout and Line by Line Programming explanation), as well as explanations on the base electronic principles. This book will literally talk you through Arduino until you are fluent enough to attempt your own projects.
- Arduino Uno Board - This is the base Arduino Board, it is not specialized like other Arduino Boards but is rather to be designed to be good at all things. It is a great place to start in your adventures with Arduino!
- Electronic Components - You get a swathe of Electronic Components with your kit, from things as simple as LED's to an LCD Display, Servo and a H Bridge (Used to make a Motor Rotate in different directions). These components are all you need to complete the projects in the book, but they will also be there when you want to attempt your own things.
- Breadboard - I mentioned this previously. It is like an infinitely variable PCB, this means that it can be used to prototype designs quickly and easily. The Projects Book explains how to use this!
- USB Cable - This is important as it is how you connect your Arduino to the computer. You download your programs through the cable and it is one way of powering your Arduino.
- Battery Snap - This can be used to connect your Arduino up to a 9v Battery, so that you can use it on the move!
- Wooden Work Board - You can mount your Arduino and Breadboard to this Work Board so that it is easier to make your projects.
This kit is fantastic value for money! I could not recommend it enough! The amount of things you get for the price and the knowledge it gives you are simply fantastic! For those new to the hobby, you would be hard pushed to find something more suitable. However if you are more experienced at Electronics and have components to use in your projects then you can just by a base Arduino Board seperately. However you will need a USB A to USB B cable to program your board. Here's a link!
All in all Arduino is fantastic! I have only done a few projects and I have already learnt so much about the programming language (C) and I love it so much! Definitely a worthwhile purchase! You will definitely be seeing a lot more of the Arduino on this blog in the future!
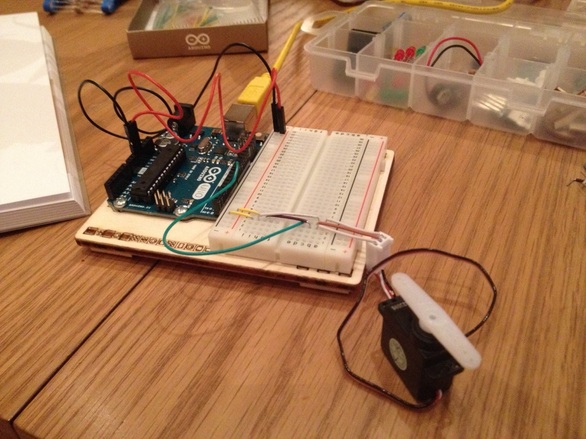
I shall leave you with a few pictures of a few things I have done with the board already! Prepare yourselves, tomorrow is Robot Arm blog day!
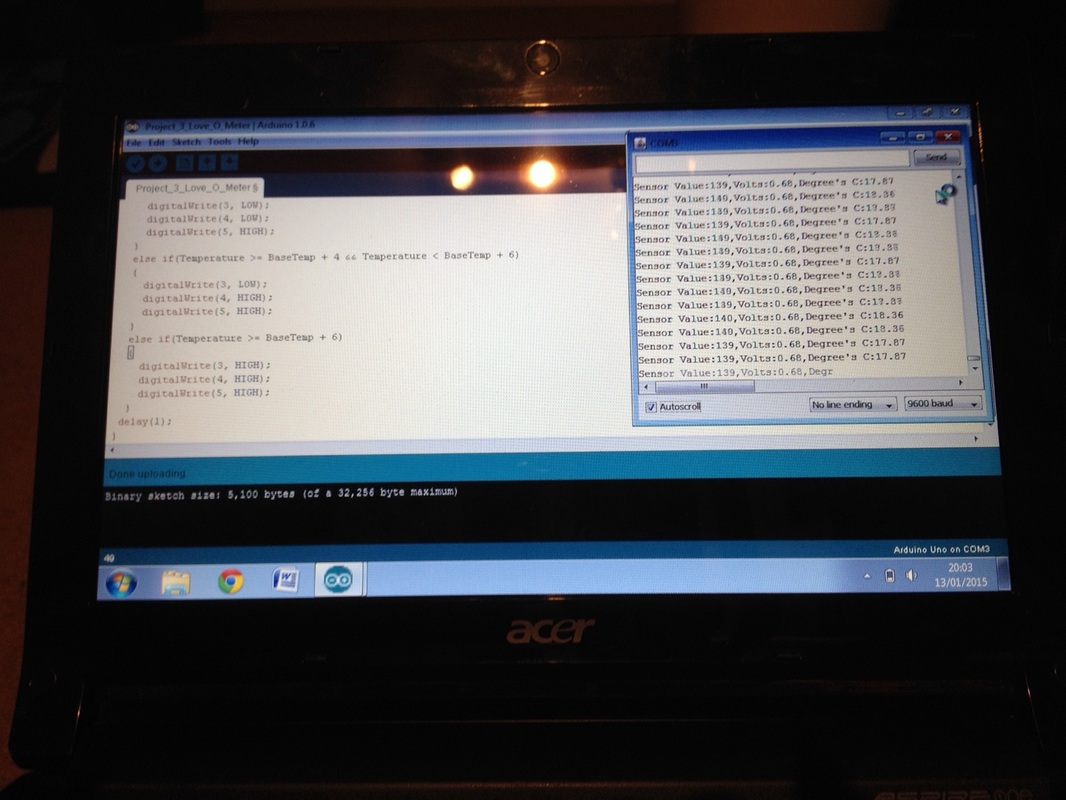
The Arduino Acting as a Temperature Sensor (Love - o - meter Project!)
I shall leave you with a few pictures of a few things I have done with the board already! Prepare yourselves, tomorrow is Robot Arm blog day!
The Arduino Acting as a Temperature Sensor (Love - o - meter Project!)
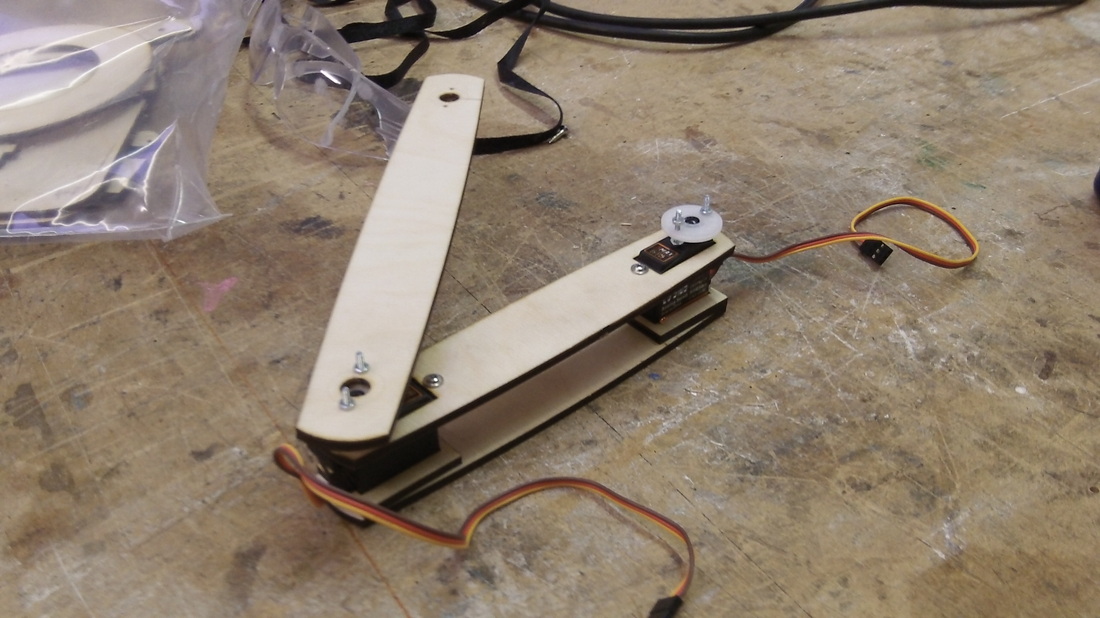
Arduino used as a Servo Controller